Manage notifications and privacy to reclaim your (digital) life
Modern smartphones often feel like demanding overlords. Unchecked notifications, blinking screens, endless newsletters, and invasive tracking can erode your focus and peace of mind.
The good news is you can take back control. In this guide, I will show you how to reclaim your digital and phone life step by step – from taming notifications to pruning unwanted emails – all in clear, practical terms.
These tips require little technical know-how, yet even tech experts may find a few new tips. Let’s get started on making your phone serve you again, rather than the other way around.
Content
Manage notifications
Constant pings and pop-ups are more than just annoyances – they can seriously affect your well-being. Incessant, irrelevant alerts cause “notification overload,” which raises stress and digital fatigue. Many people cope by silencing everything, but then risk missing important personal messages. It’s time to find a healthier balance.
Why prune your notifications?
App makers know that each buzz or banner is a chance to pull you back in. Some apps blatantly push ads or self-promotions through notifications, while others send subtle nudges (“Your friend posted a photo” or “You have new recommendations”). This engagement trickery leads to a flood of alerts that buries the truly important stuff – like texts from friends or reminders you set yourself. In the worst case, you stop noticing or responding to real messages, which can strain your connections.
Take control on Android
Google’s Android gives you excellent tools to fight back. Since 2017 (Android 8.0), apps must categorize their notifications into channels (also called categories). This means you can go into your phone’s Settings > Notifications, pick an app, and see toggles for each type of alert that app might send.
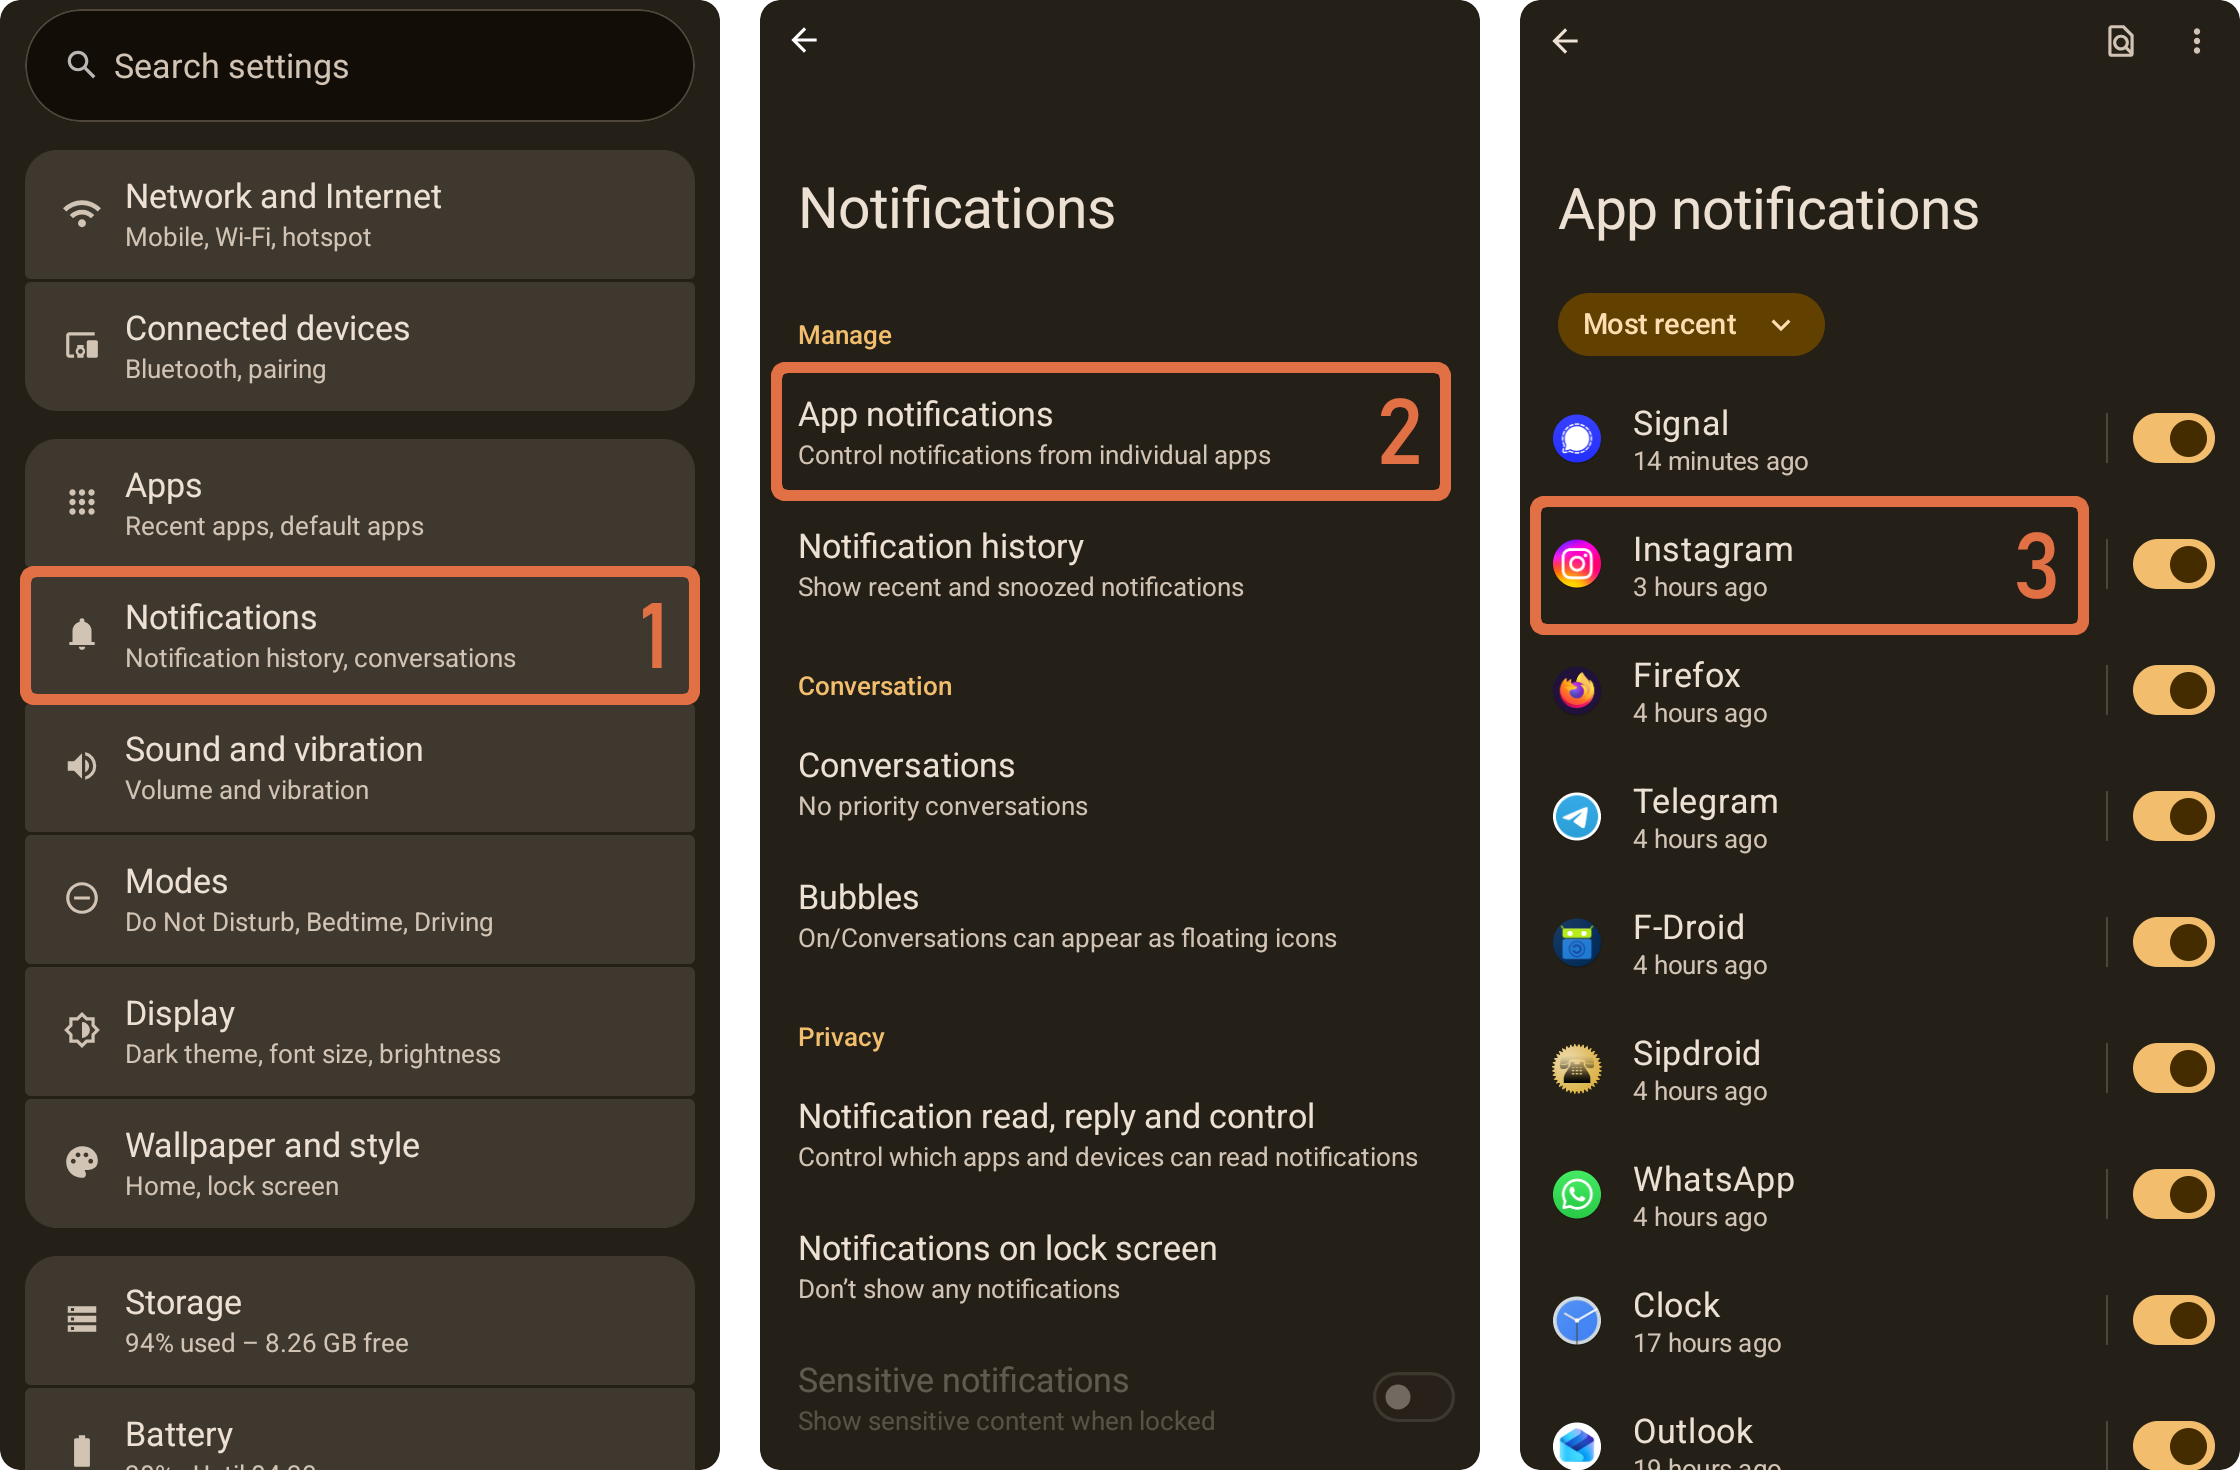
For example, you could disable “promotions” or “video recommendations” while keeping personal chats or delivery alerts enabled. These channels are often grouped by topic – so one switch might turn off all non-essential “marketing” notifications for that app. You can keep receiving just the notifications you care about and mute the rest. If an app developer was lazy and lumped everything into one channel, consider whether you really need any notifications from that app at all.
Here is an example video of how to fine-tune the notifications for Instagram on Android:
In this video, we can see that Android may hide some notification channels behind the option “Show unused categories”. Make sure to tap that option to see all possible notification events.
Take control on iPhone / iOS
Apple’s iPhone does not support or mandate Android-style channels at the system level. On iOS, you can usually only enable or disable notifications per app – granular control is left to the app’s own settings (if the developers bothered to include them). This means a bit more legwork for you.
Go to Settings > Notifications and review each app’s settings. Many apps will only present a basic on/off switch here. For finer detail (like muting certain notifications but not others), you often have to open the app itself and find its internal Notifications or Preferences menu. Seems like extra work but it is totally worth doing.
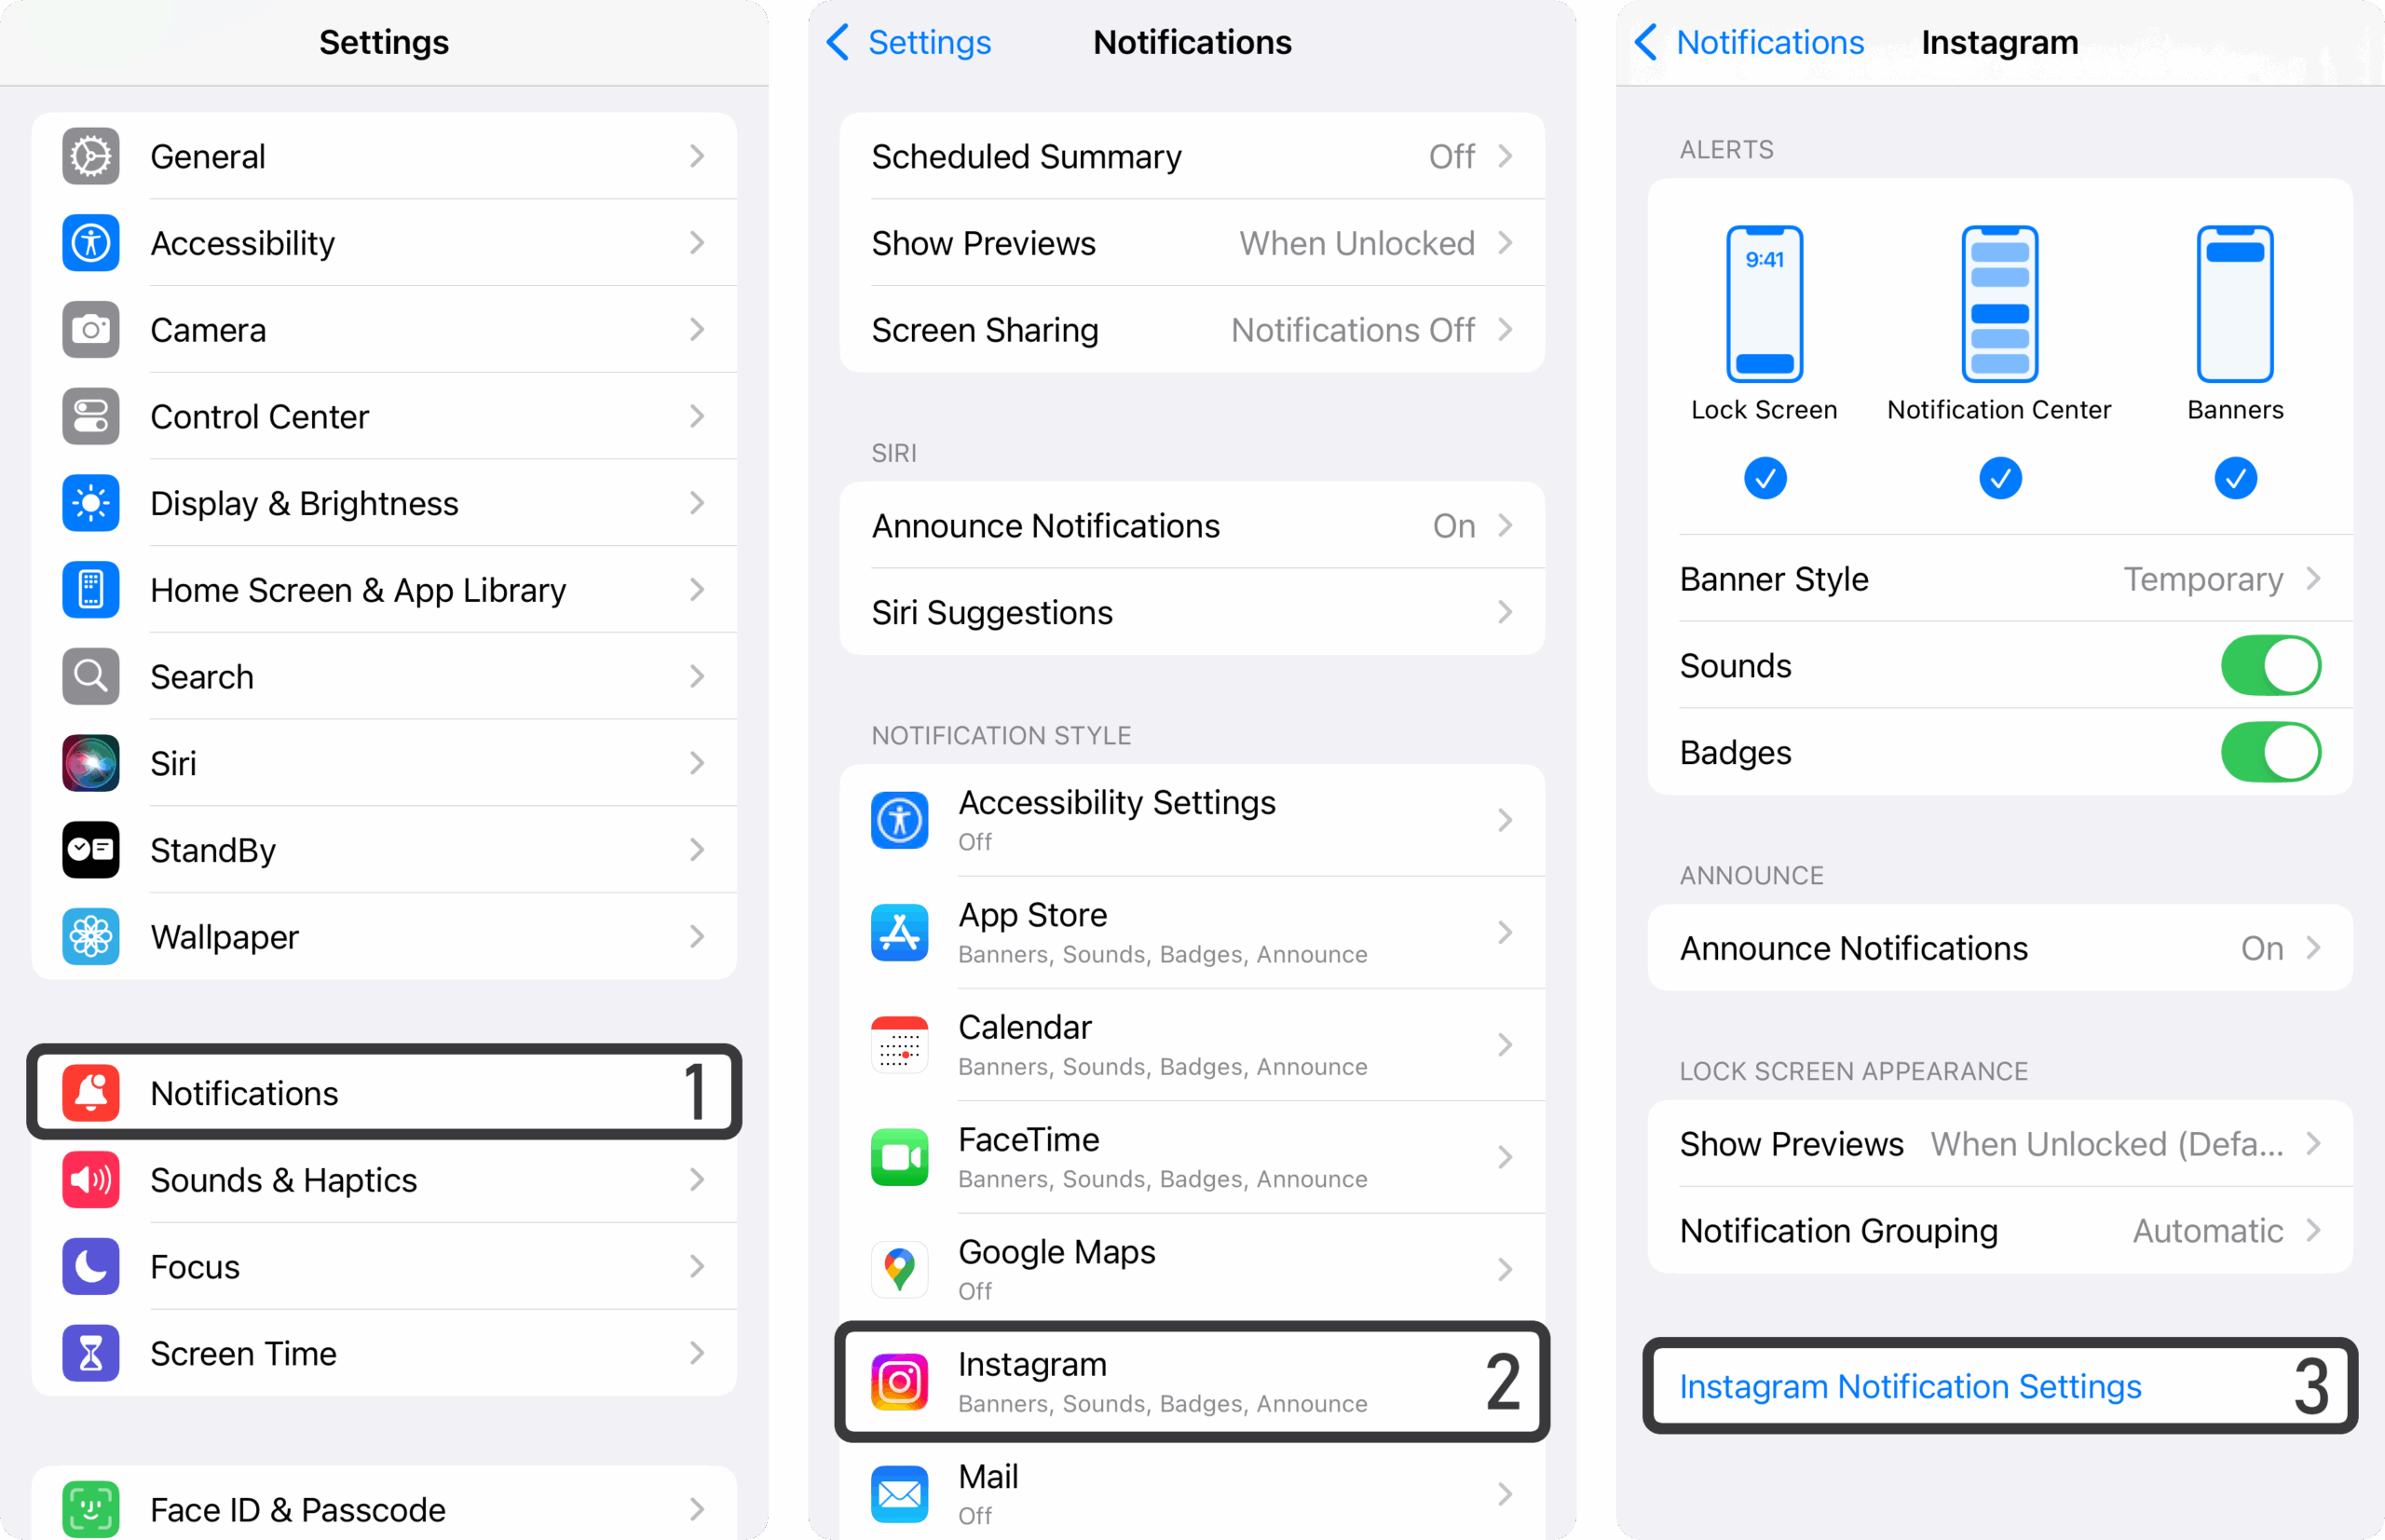
Here is an example video of how to fine-tune the notifications for Instagram on iPhone:
As we can see in the video, the fine-tuning is done in the settings of the Instagram app, not in the iPhone settings. There are countless of events for which Instagram would like to push notifications – and you can disable or customize each and every one of them. It takes a little while, but it’s worth it.
Major platform apps like Facebook, Instagram, LinkedIn, etc. offer these very granular in-app notification sub-settings, but plenty of others (especially lesser-known apps and some banking or shopping apps) simply don’t. In those cases, the best course of action is to just turn all notifications from such ‘quick-and-dirty’ made apps.
Obscurity by design
Some major platform operators intentionally make granular control more time-consuming. For instance, Facebook will notify you about every group post by default, but offers no single master switch to change that. You actually have to disable group notifications for each group individually. This can really add-up over time if you ever used Facebook groups for networking or as a marketplace.
There are also apps like Uber: they have some granular notification control in the app under Settings > Communications > Notifications, but there is no link from iPhone’s notification settings dialogue (see this demo video).
Uber probably wants you to think “I better should not disable notifications, because I still need to know when my Uber driver contacts me” – but then push-notifications for “promotional offers”, “membership benefits” and “interesting news” are being left on by default, increasing total engagement numbers for the company. Apple does not seem to have clear rules and mandates around app developers providing easy access to notification control from the Settings app, despite having a de-facto monopoly with the App Store on iPhone.
Don’t let such dark patterns discourage you – take the time to dig a little and turn off those unwanted alerts. It’s a one-time, finite chore with an infinite payoff in reduced distraction.
How to decide: notifications on or off?
A rule of thumb is to disable notifications for apps that are not communication-critical. Do you really need that shopping app or game to ping you? Probably not. For truly important apps (messaging, email, calendar, maybe your banking app), go into their notification settings and fine-tune the types of alerts: e.g. allow direct messages or mentions, but not general “updates.”
Remember, any notification you leave enabled should serve you – if an app mostly serves itself with engagement prompts, feel free to silence it.
Shouldn’t spam-free settings be the default?
There is an argument to be made that national spam regulations should apply to push notifications, making promotional alerts opt-in only (see appendix). Until lawmakers or platform policies catch up, though, it’s on us users to manually opt out of the notification deluge.
Screen turning on automatically – do you really want that?
Notifications are one thing – but have you noticed how your phone screen lights up with every incoming alert? That glowing screen is a visual grenade thrown into your calm, and science backs this up. Studies have proven time and time again that visual distractions impair your focus far more than audio cues.
Visual distractions pull you out of the moment, and your brain requires more effort to get you back into the task (or conversation) that the distraction interrupted.
So, let’s defuse these distractions by keeping the screen dark unless absolutely necessary.
Disable lock-screen pop-ups
Both Android and iOS allow notifications to be delivered quietly without lighting the display. The key is adjusting where notifications can appear. Typically, you have three levels of notification visibility:
| Lock screen | Shows the alert when your phone is locked, usually waking the screen. |
| Banner/Popup | Shows a brief banner at the top if you’re actively using the phone. |
| Notification Center only | Collects the alert silently; you only see it when you manually pull down your notification shade or lock-screen history. |
For non-urgent notifications, you want to deny them the lock-screen (and thus, the ability to light up your phone), and perhaps even the banner.
Configure those to Notification Center only.
This way, you’ll still get the information, but on your terms – the phone stays dark and you check the notifications later, at your leisure.
On Android, in the app’s notification settings you’ll often see checkboxes or toggles for “Display on lock screen” or “Pop on screen.” On iPhone, when you open Settings > Notifications > [App], you can uncheck “Lock Screen” and “Banners,” leaving only “Notification Center” enabled.
The result: no more random screen flashes on the desk or in the corner of your eye. Your phone will make a sound or vibrate (unless you’ve silenced it), and you can peek when you’re ready.
Turn off “Raise to Wake” (make the phone less hyperactive)
Ever notice your phone screen turning on just because you picked it up or even nudged the table? That’s thanks to a convenience feature called “Raise to Wake” that automatically wakes the display when the device moves a bit.
In theory, it’s handy: you want to check the time or see notifications, and voila – the screen shows up without you pressing a button.
In practice, however, raise-to-wake causes a lot of false positives. Your screen might light up when you carry your phone in your hand, when you fidget at your desk, or whenever the accelerometer imagines you intended to check the phone.
Each accidental wake is another unwarranted flash, another chance for an icon or message preview to catch your attention when you didn’t actually want to use the phone.
From a digital wellness perspective, this defaults to maximal engagement – the phone is proactively trying to get your eyes, even when you haven’t consciously decided to look.
How to disable it:
- On iPhone, go to Settings > Display & Brightness and toggle off “Raise to Wake.” (While you’re there, you might also turn off “Tap to Wake” if you find you accidentally tap the screen a lot.)
- On Android phones, the setting can vary by manufacturer, but look under Display or Lock Screen for options like “Lift to wake,” “Raise to check phone,” or “Ambient display.” Samsung, for example, has a “Lift to wake” toggle in Settings > Advanced features > Motions and gestures. Others may have it under Settings > Display > Lock screen. Just go look and you will find.
Now, you pick up your phone and it stays off; unless you really need to use it, you might just put it back down. Many people report significantly reduced screen time after doing this, precisely because the device isn’t constantly inviting usage anymore. It sits quietly, like a tool waiting to be used, rather than a hyperactive pet jumping at every motion.
Disable “Always-on Display”
If your phone has an Always-on Display (AoD) – a feature that shows a dim clock or notifications constantly – consider turning that off or configuring it to hide notifications. While AoD can be convenient for a quick time check, it’s still a constant visual stimulus. Many users find disabling it further reduces the urge to glance at the phone.
Declutter your newsletters and brand channels
Not all digital clutter lives on your phone’s home screen – a lot of it overflows from your inbox and messaging apps. Thankfully, these are areas where a little spring cleaning can go a long way. Let’s start with email newsletters.
“Unsubscribe” links are at the bottom
Remember all those times you entered your email for a discount code or signed up for “updates” from a website? The result is likely a flood of newsletters, promotions, and other automated emails vying for your attention daily. It’s time to hit unsubscribe on as many as possible.
Thanks to national anti-spam regulation in many countries and regions, legitimate senders must provide an easy unsubscribe option in every mass email. Laws like the U.S. CAN-SPAM Act and Europe’s ePrivacy Directive require a “clear and conspicuous” unsubscribe link in any marketing email.
This means almost every newsletter has a one-click unsubscribe link (usually at the bottom in fine print). Use them – it typically takes under 10 seconds per email.
Go through a week’s worth of your emails and identify the repeat senders that aren’t personally writing to you. Scroll down and find that “Unsubscribe” or “Manage preferences” link. Often it’s instant; at worst you might have to confirm on a webpage.
You generally won’t need to log in or remember any password – if a company makes you do that just to unsubscribe, they’re not compliant with best practices and regulation. Most reputable organizations make it one-click or at least very straightforward (“You have been unsubscribed”).
Google Mail (Gmail) automatically sorts such spam into “Promotions”, “Social” and “Updates” tabs. But these mails still crowd your inbox and fill up your digital storage. Go into these categories and unsubscribe one-by-one.
This small-time investment will pay off with a lighter, more meaningful inbox.
Unfollow or block brand channels on messenger apps
Email isn’t the only place companies reach you. In many parts of the world (especially East Asia), brands and stores also use messaging apps to blast announcements. Apps like LINE, Telegram, WhatsApp, or others offer “channels” or official accounts you might have followed to get a coupon or the latest news. Over time, you may have accumulated a bunch of subscriptions you don’t truly care about – each sending notifications or at least cluttering your chat list. Now is a good time to prune these as well.
Open your messaging apps and look at any feeds or channels that aren’t private one-on-one chats. If you see shopping updates, news blasts, or corporate accounts, consider unsubscribing or muting them.
The idea is to curate your feeds to only those that add value to your day.
Some platforms make this easy with a “Leave channel” or “Unsubscribe” button. Others are a bit sneaky. For example, in the LINE app (ubiquitous in Japan, Taiwan and Thailand), there’s no obvious “unsubscribe” for a company’s official account. Instead, you have to block the account to stop receiving its messages: from your list of recent chats, enter the unwanted brand channel, click on the account name or avatar, find the little “…” menu and select “Block”.

Mute (or leave) noisy group chats
Group chats: love them or hate them, most of us are in at least a few. They’re fantastic for staying in touch with friend circles, family, or coordinating events. But some group chats inevitably turn into constant chatter or become the lonely stage of a few broadcast-happy individuals after the chat has moved beyond its original purpose.
The solution is strategic muting and pruning:
- Mute high-traffic groups: For group chats that you do want to be part of, but which buzz non-stop, take advantage of the mute function. Most messaging apps let you silence a chat – either indefinitely or for a set duration (e.g. “Mute for 1 week”). When muted, the conversation will no longer send audible alerts or vibrations. You’ll stay in the loop, but on your own schedule.
- Leave groups that have run their course: Sometimes, a group chat was created for a specific purpose – a project, an event, a trip – and once it’s over, the chat turns into idle noise or dies out. It’s perfectly fine to exit such groups. Don’t worry about offending anyone; chances are others will have already left silently. If it was an important group, you can also leave a “farewell” message, indicating to users that they can reach you over private message, before you leave. But that’s optional – you have the right to leave without ceremony if you prefer.

The overarching principle is notifications from people should enrich, not overwhelm. Good friends won’t mind if you don’t respond instantly in a group chat – and by muting or cutting back, you’re ensuring that when you do engage, it’s with your full attention and without resentment.
Browse the web like it’s 1995: with an ad-blocker
Much of our phone usage involves the web – reading articles, checking news, looking things up. But if you’re using the default browser that came with your phone, you’re likely enduring a subpar experience: intrusive ads, auto-play videos, pop-ups, and slow pages. Reclaiming your digital life isn’t just about stopping interruptions; it’s also about removing friction and junk content from your screen.

Beyond comfort and speed, an adblocker also quietly improves your security. Every ad, tracking pixel or “social widget” is usually a separate script loaded from a third-party server. Each of those extra JavaScript files is another potential way for an attacker to slip in malicious code through compromised ad networks (“malvertising”, see examples [1] [2] [3]).
By using an adblocker, you drastically reduce the number of external domains your browser connects to and the amount of code it executes in the background, resulting in a smaller attack surface: less chance of a shady script, less room for cross-site shenanigans, and fewer surprises when you just wanted to read an article.
Step 1: install a mobile browser with support for extensions (add-ons).
My recommendation: use Firefox
Firefox for Android is one of the few mobile browsers that support add-ons, and uBlock Origin is a lightweight, highly effective ad and tracker blocker. It’s free and open-source, with no affiliation to shady ad companies.

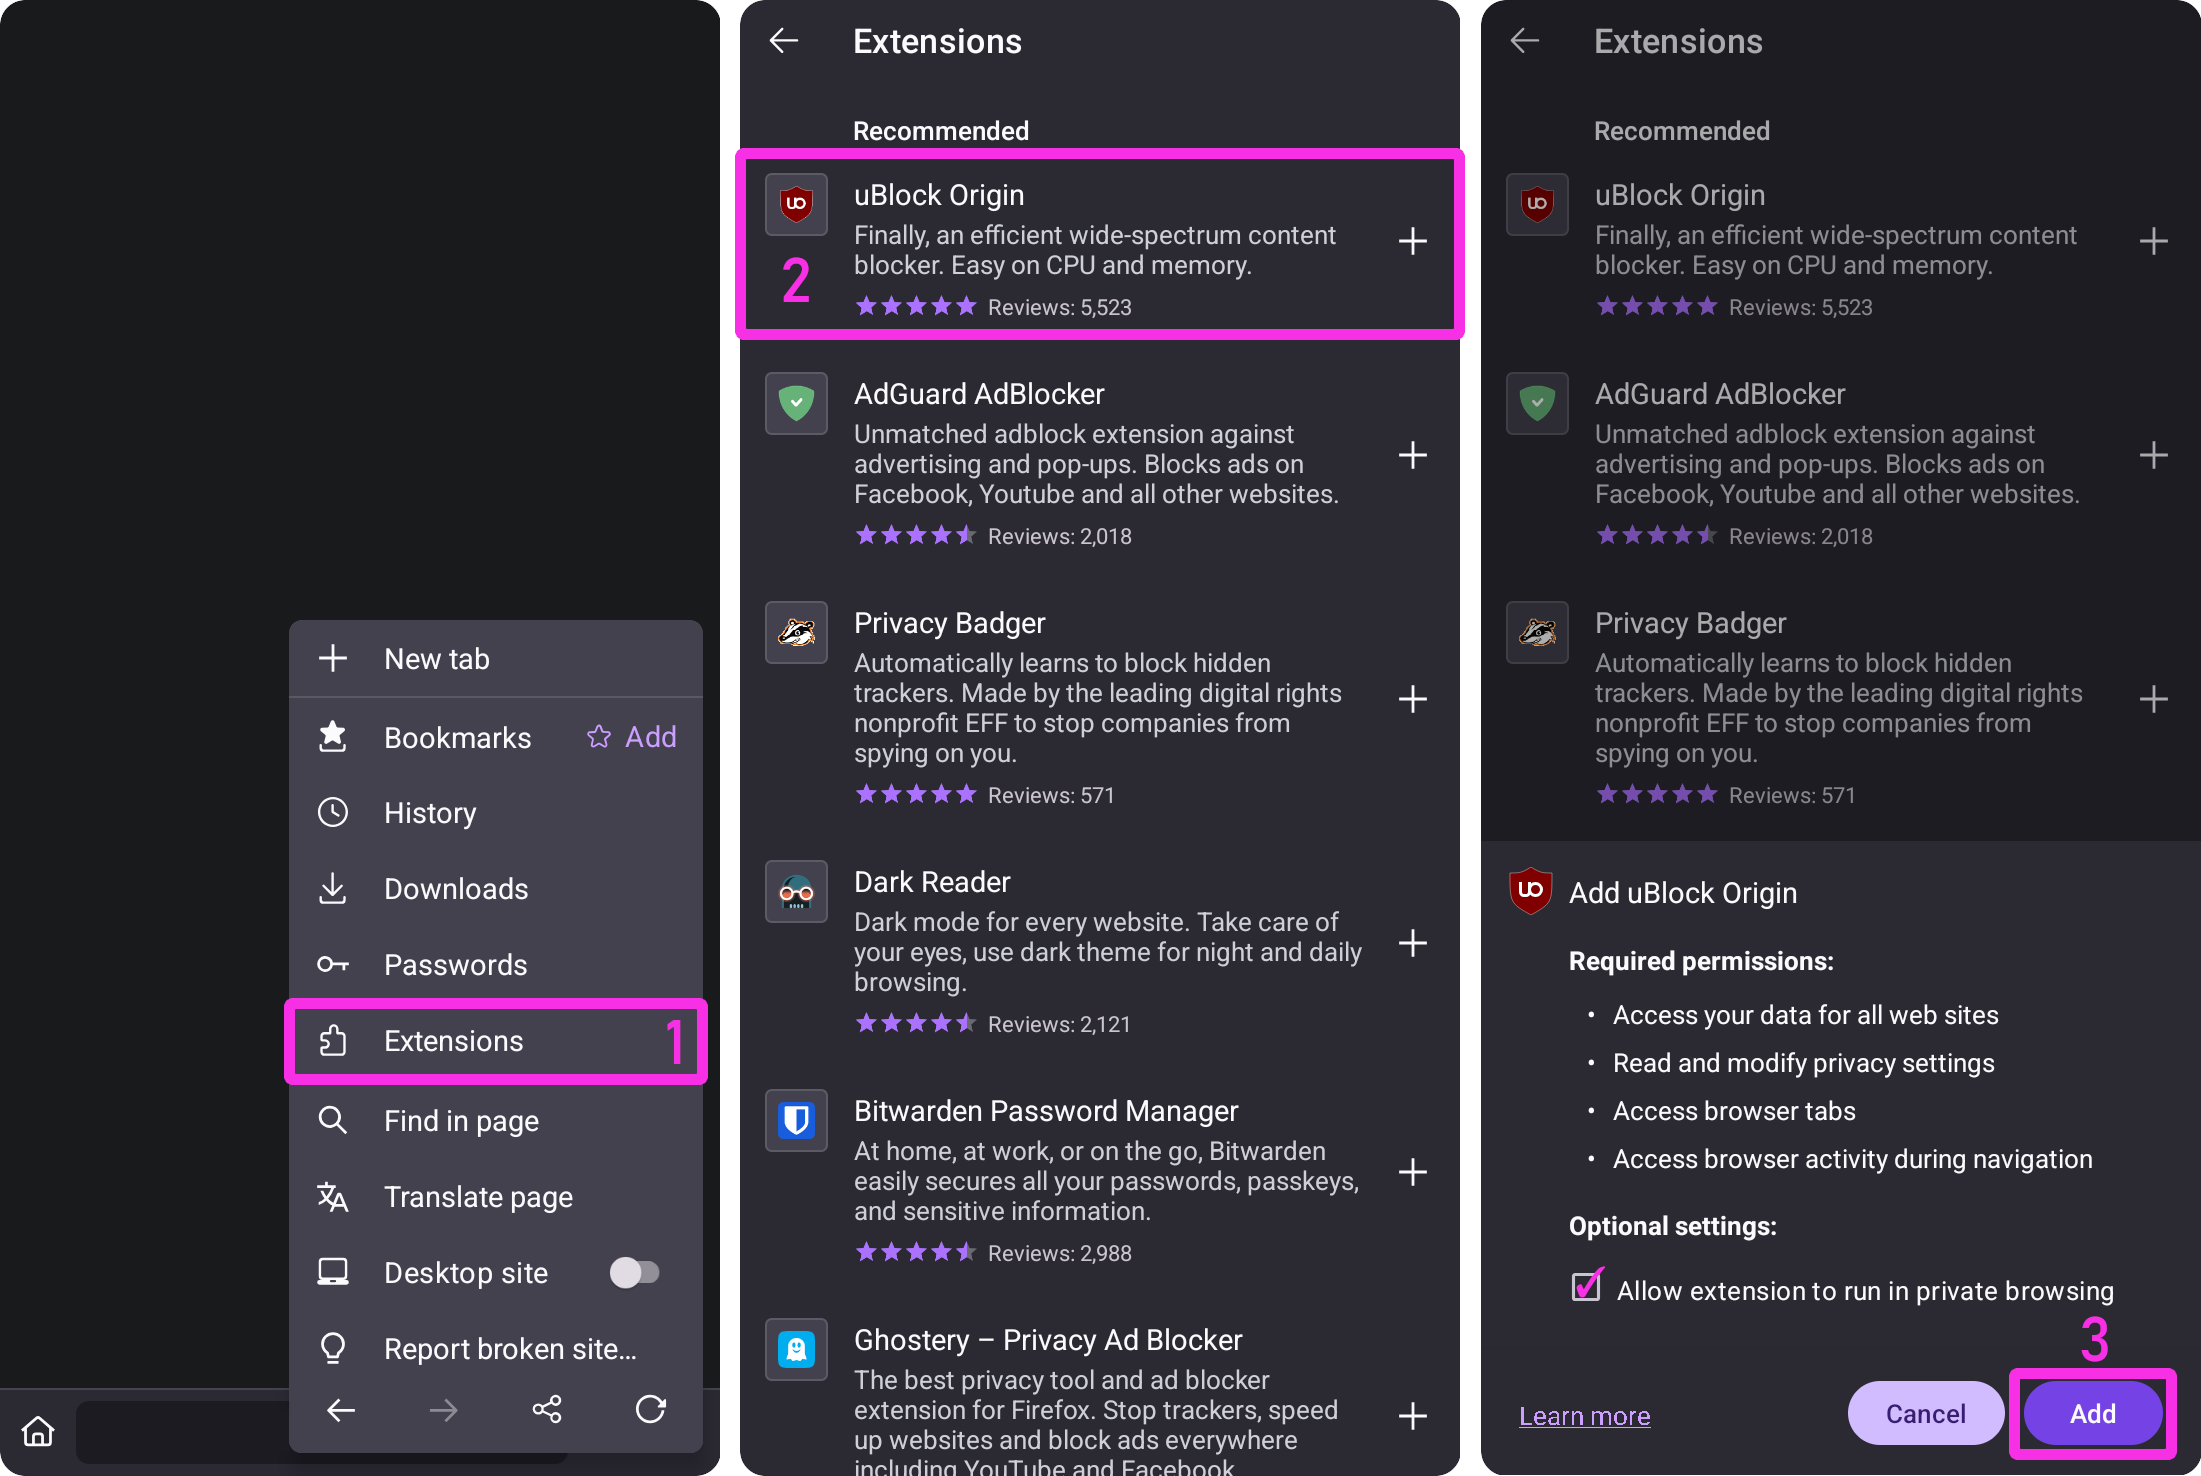
How to set it up: On Android, download Firefox from the Play Store. Open Firefox, tap the menu (usually three dots) and find the Add-ons or Extensions menu. You’ll see a list of recommended extensions – uBlock Origin should be right at the top (it’s one of the most popular). Tap the + to install it. That’s it!
uBlock Origin works quietly in the background, and you can always tap its icon in the menu to see what it’s blocking or to whitelist a site if needed.
On iPhone, full Firefox can’t use extensions due to Apple’s restrictions. Instead, iOS can simply install Firefox Focus which already comes with ad-blocking out-of-the-box.
By using these solutions, you’ll see most ads vanish from websites and you’ll fend off many trackers that try to profile you. The difference in page load speed and readability is night and day – say goodbye to those obnoxious banners and video ads that take up half the screen.
Notes:
- Many sites rely on ads for revenue, and some detect blockers. uBlock Origin has an option to disable on certain sites, so consider allowing ads on websites you truly want to support – ideally those with reasonable, non-intrusive ads. The power here is that it’s your choice what to block or allow.
- uBlock Origin also works on YouTube, when you use YouTube in your browser. Iit’s the same thing – minus the ads. Also includes a full screen mode. There is really no need to use the YouTube app anywhere. I would just uninstall it.
Sync your mobile Firefox with your PC/laptop/desktop Firefox
If you use Firefox on your PC/laptop (Windows, Linux, MacOS), you can sign in on your phone and sync bookmarks, open tabs, and even history. This means you can, for example, pull up a tab on your phone that you left open on your laptop – super handy for researching on the go.
There’s also a Send Tab to Device feature: find an interesting article on your phone that you want to read later? You can send it to your PC’s Firefox (or vice versa) with two taps. No need to email links to yourself anymore.
Open Firefox from 3rd party apps
After installing Firefox, set it as your default browser on your phone. This ensures that whenever you tap a link in another app (say, a link a friend sent in chat, or a link in an email), it will open in Firefox with your ad blocker active, rather than in some built-in browser with no protection.
On Android, you can do this in Settings > Apps > Default Apps > Browser and choose Firefox. On iOS, go to Settings > Firefox > Default Browser App. Now every web link benefits from the cleaner, faster experience you’ve created.
Take charge of your data and privacy settings
Last but certainly not least, reclaiming your digital life means asserting control over the data big platforms collect about you. If you have a Google account (for Android users, you certainly do; iPhone users, you might as well for Gmail, YouTube, etc.), or use social networks like Facebook, Instagram, or TikTok – you have more power than you might think to limit what these companies store about you.
Thanks to growing privacy regulations and user demand, the major tech firms are mandated to provide dashboards where you can review and adjust your privacy settings.
Prime example: Google
Let’s use Google (formerly known as the “don’t be evil” company) as an example, since its account ecosystem is broad and the controls are relatively user-friendly.
Google’s Privacy Dashboard (found in your account under Data & Privacy or directly at myaccount.google.com) has easy-to-use privacy settings, all in one place – a result of them consolidating controls due to laws and user pressure. Here is an overview:
Video demo:
Here are some of the things you can do on Google’s privacy settings page:
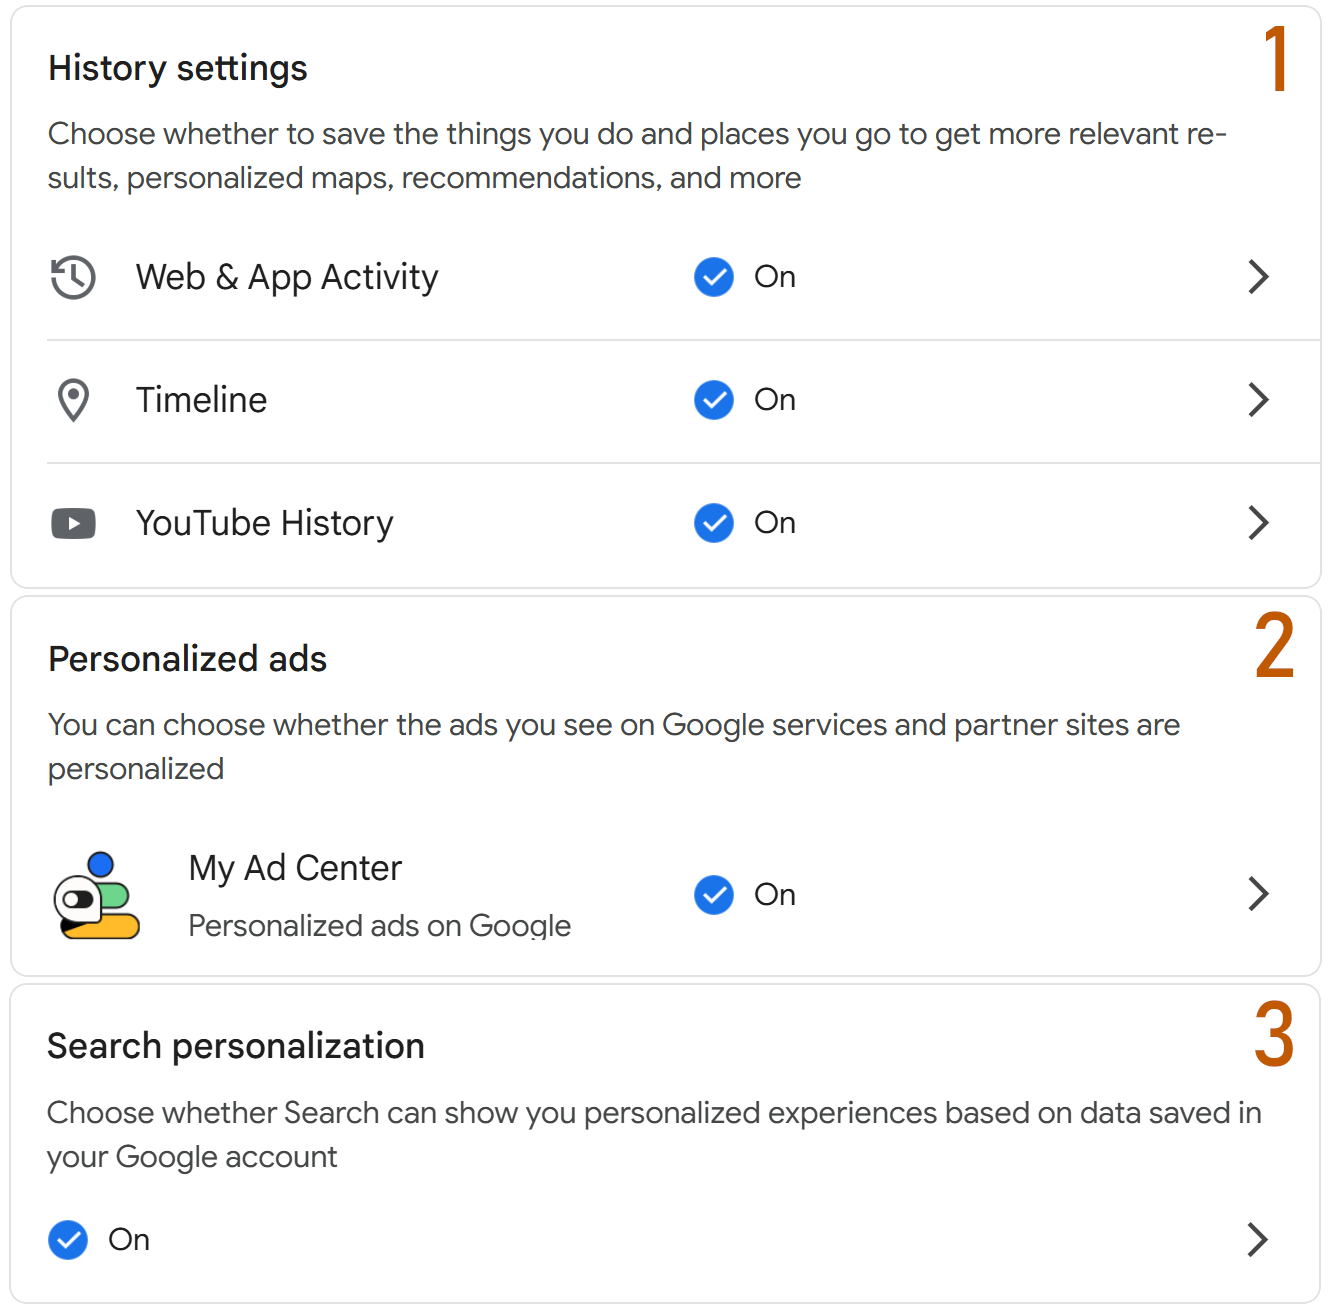
- Turn off unwanted data collection: Under History Settings, Google lets you toggle whether it keeps logs of your Web & App Activity (which includes searches and Chrome browsing), YouTube history, location history, etc. For example, you might want to pause location history if you don’t need Google to remember where you have been every time of day. Each option is explained in plain language on the settings page, so you know what you gain or lose by turning it off.
- Auto-delete old data: For data you do want Google to collect (perhaps you like having YouTube remember what you watched, or Google Maps tracking your past trips), you can still put a cap on how long they hang onto it. Google provides auto-delete options where you can say “delete history older than 3 months” (or 18 months, etc.). Think of it as setting an expiration date on your data. In fact, as of 2020, new Google accounts auto-delete Web & App and location data after 18 months by default. But for older accounts, you need to set this yourself.
- Disable ad-personalisation: Platforms like Google, Facebook and Amazon build a profile of your interests to serve targeted ads. In Google’s account settings, check Ad Settings or Ad Personalization. You’ll see categories Google thinks you like (sports, cooking, etc. based on your activity). You can delete or edit these interests, or turn the whole ad personalization off. Other platforms have similar options under Account/Settings > Privacy.
How can I trust that Google really stops collecting my data once I opt-out of these settings?
Major tech companies operate under strict national and international privacy legislation: GDPR in the EU, state-level privacy laws in the US, and similar regimes in many other regions. These frameworks don’t just require companies to offer meaningful privacy controls; they also impose severe penalties for misrepresenting how those controls work.
If Google were ever caught circumventing its own opt-out switches – whether through a whistleblower, a data breach, an audit, or law-enforcement discovery – it would face massive fines, a devastating loss of public trust and potential class-action lawsuits.
From a pure risk–reward standpoint, it makes no sense for a company to jeopardize its entire reputation just to secretly track the small minority of users who turn these features off. The real value for Google lies in aggregate patterns across millions of consenting users, not in secretly profiling individuals who explicitly opted out.
Extraordinary claims require extraordinary evidence – and until such evidence appears, it is reasonable to assume compliance rather than conspiracy. Of course, there have been some mishaps in the past – nobody is perfect. But that’s no reason to volunteer your data willingly.
The same argument applies to all other major platforms – Google is just the most prominent example here. Surveillance thrives on voluntary disclosure. It is the duty of every democratic citizen to oppose the erosion of civil liberties.
Do it for all major platforms
Set aside about 5 to 10 minutes for this privacy tune-up on each major service you use.
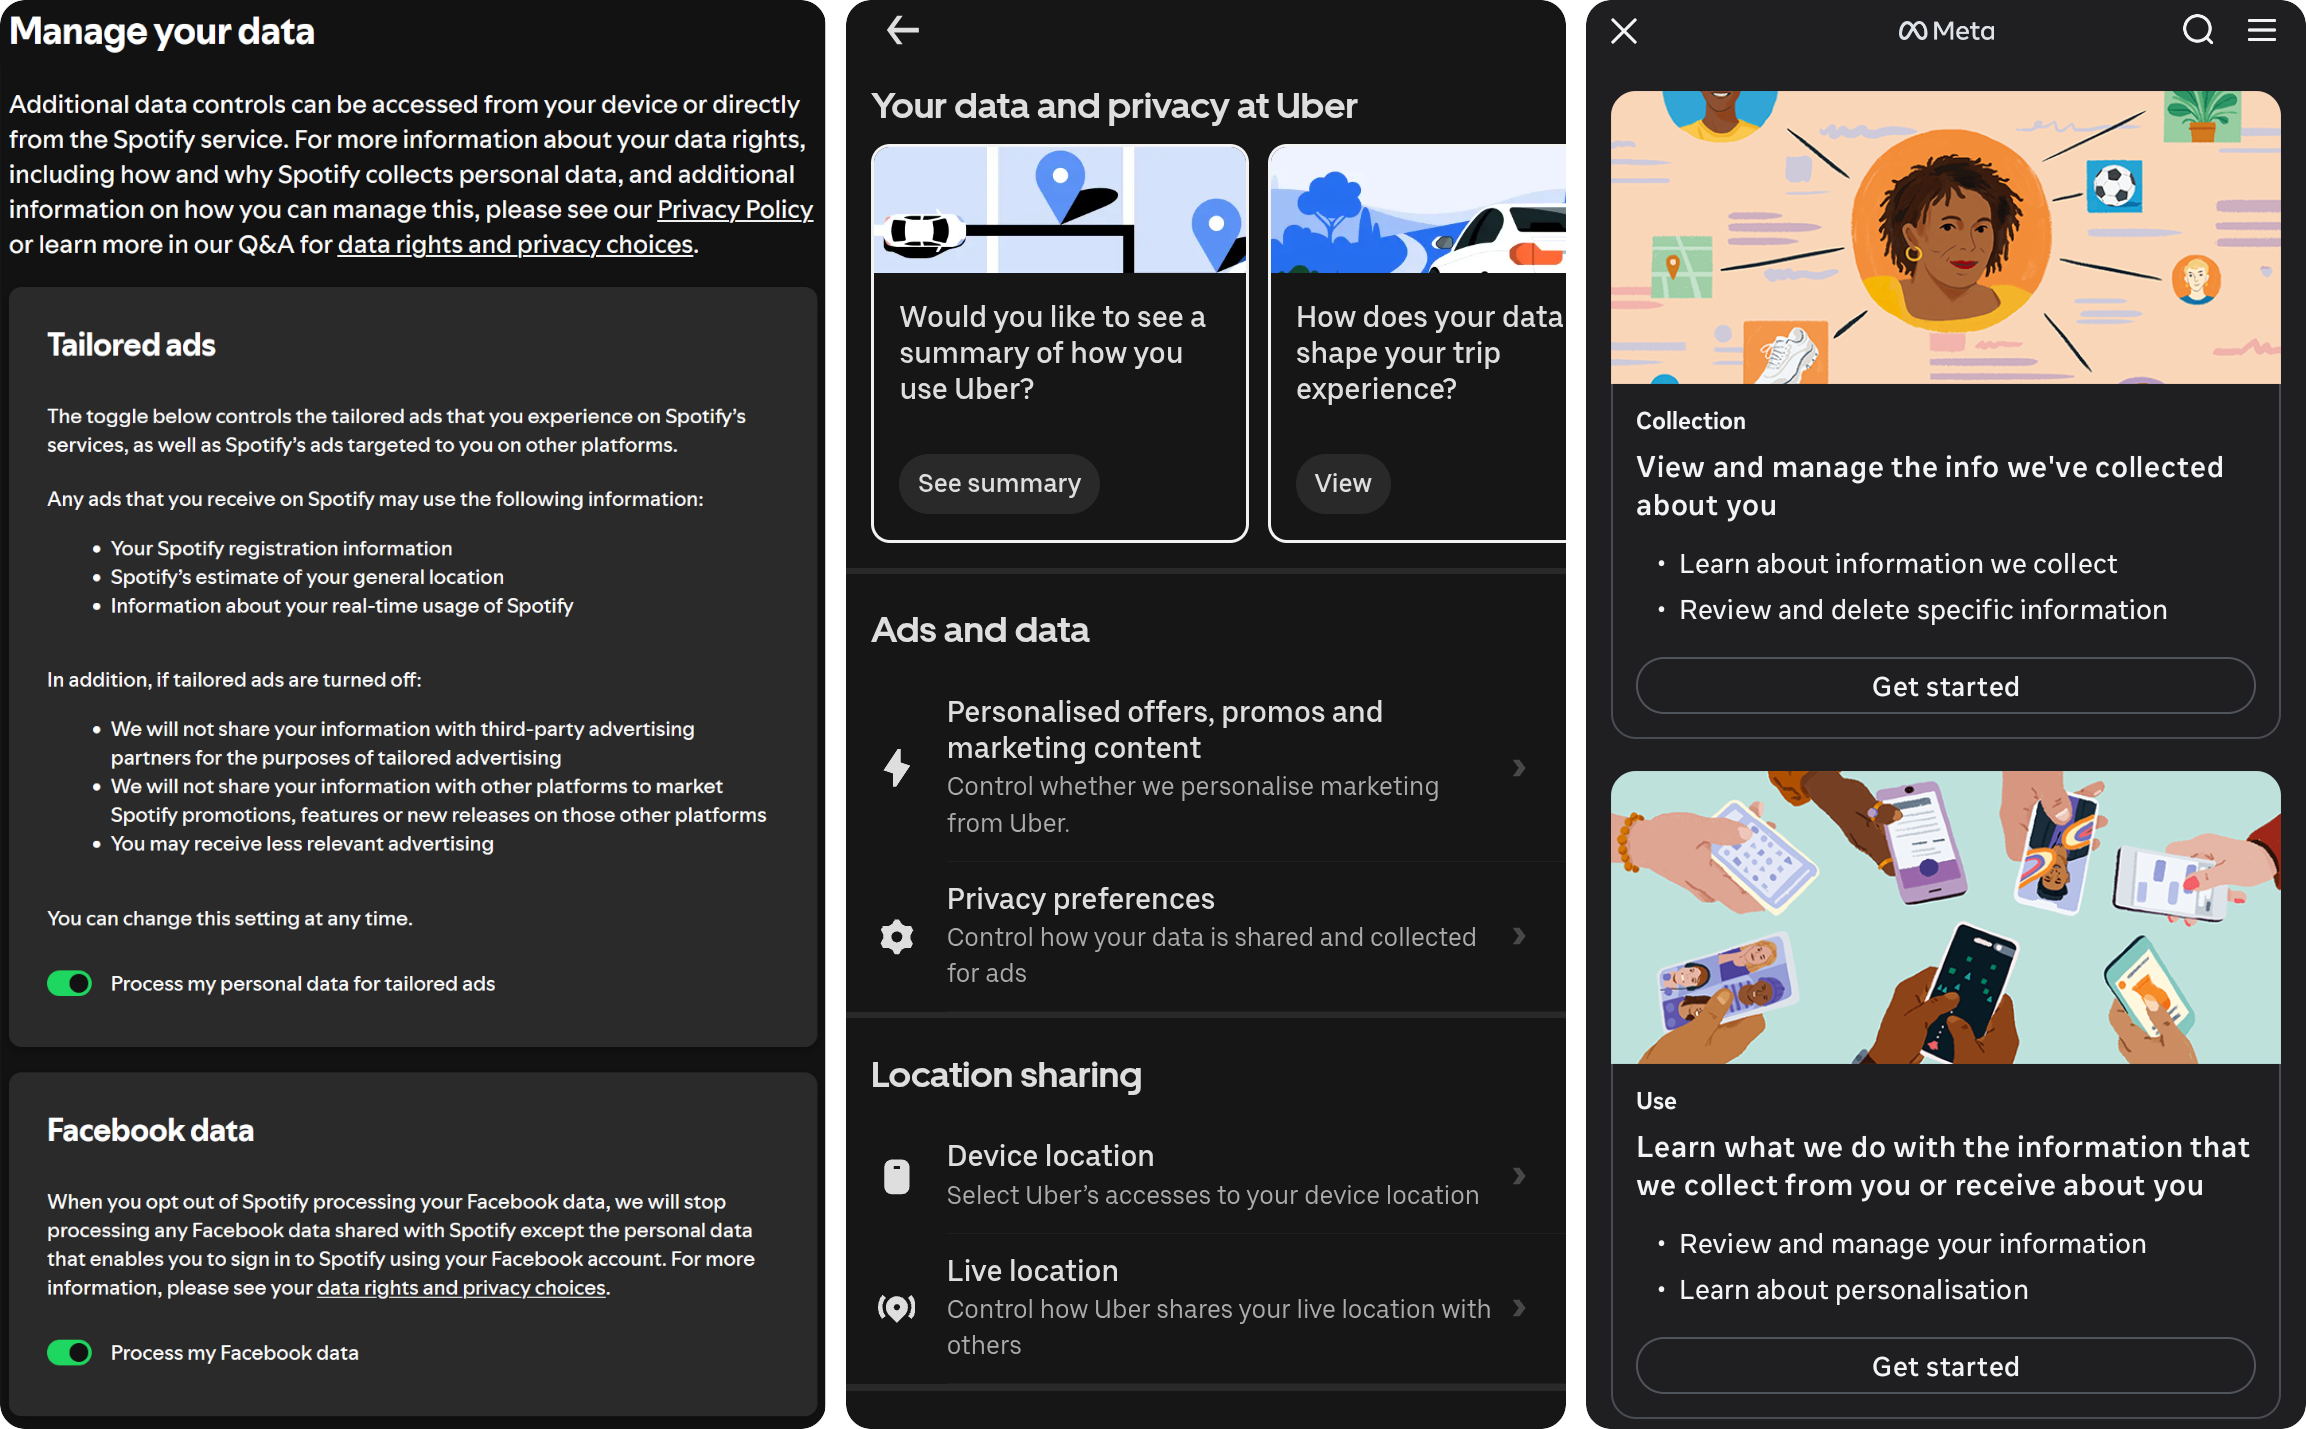
Not all of them are as straightforward as Google. Some bury the relevant settings behind loads and loads of self-advertising ‘help center’ articles. But if you are registered in a region with strong data-protection regulation, chances are you will find some effective toggles to disable ad-tracking, location-sharing, and options to opt-out of using your data for training the platform provider’s AI networks.
Every click makes a difference in limiting how much data is stored about you. When you’re done, you’ll have a cleaner digital slate and peace of mind knowing you’ve asserted your rights over your own information.
Do it once, benefit forever
Once you’ve done the big clean-up – notifications set, screen quieted, inbox cleansed, better browser chosen, privacy settings adjusted – the daily effort of maintaining this new distraction-free serenity is minimal.
- Subscribed to a new service or platform? Check their privacy settings right away, before you start using it.
- New app asks for notification permissions? Don’t just click “Accept” everywhere out of reflex. Pause and decide if you really want that.
- When you sign up for something with your email, uncheck “send me updates” if you can. If there was no “opt-out” button during sign-up, find it then in the first marketing mail they send you.
Think of it like tending a garden: a little regular weeding will prevent another overgrown jungle of distractions.
Wrapping up
Reclaiming your digital/phone life is about making your devices respect your attention and your time. By implementing the steps above, you’ll transform your phone from a source of stress into a helpful companion that stays silent and out of the way until needed. You’ll notice more calm in your day, more intention in your screen time, and perhaps rediscover the joy of missing out on all the digital noise.
Remember: it’s your life – the technology in it should serve you, not rule you.
Further reading
Related articles on my website:
- Keep in touch: How to find a messaging app that puts your privacy first. A clear-eyed comparison of today’s most popular messengers, what really sets them apart, and why it’s worth having one option that isn’t driven by ads or algorithms.
- Open vs. closed networks: A comprehensive overview of alternatives to the most mainstream, commercial social media platforms.
- RSS news feeds instead of social media: A thorough introduction into the concept of RSS feeds as a versatile tool to diversify your daily news consumption. Includes reference lists of where to find less commonly known news sources in areas such as politics, tech, entertainment and more.
- Custom ringtones and notifications on Android: Personalizing your Android notification sounds with custom, self-made ringtones. Article includes tips on editing tracks (including multi-track remixing of iconic 16-bit soundtracks) and much more.
Appendix: thoughts for policy-makers
Looking ahead, it makes sense to treat marketing push notifications the same way we already treat marketing emails and SMS: as direct marketing that should be “opt-in”, meaning they’d be disabled by default.
Under current EU rules, email and SMS marketing generally requires clear, prior consent and must offer an easy, cost-free way to opt out. Extending these standards to mobile apps would mean that promotional notifications are disabled unless the user explicitly requests them.
A practical, user-friendly proposal would be for regulators to require first-run notification profiles.
When installing an app, the user would see options such as “Only personal messages,” “Important and relevant,” or “Everything,” with the most privacy-friendly, low-distraction option selected by default.
This would bring notification practices in line with existing consent principles without limiting app functionality for users who genuinely want more alerts.
European authorities have warned against “dark patterns” that push users toward intrusive choices, and the European Parliament has highlighted concerns about the addictive design of digital services -especially for minors (and I would add: seniors).
These discussions broadly recognise that the current environment nudges users toward more engagement, more tracking, and more interruptions than they would likely choose themselves.
Platform companies have introduced voluntary tools like Apple’s “Screen Time” and Android’s “Digital Wellbeing”. These claim to help users monitor habits and reduce overuse, but they coexist with engagement-maximising defaults, which is quite self-contradictory.
The next logical step for policymakers would be to mandate calmer, privacy-respecting defaults, ensuring that the burden no longer rests entirely on users to undo noisy, attention-grabbing settings.
You can support this initiative, by contacting your legislative representative. Examples:
This article is licensed under CC BY. ![]()
If this article was helpful to you, please consider to buy me a coffee.
See also: contact information.